02 - Listings, graphics, tables, and references
02 - Listings, graphics, tables, and references
Code listings in LaTeX
In various reports or articles it is often necessary to include a
fragment of code. A short single-line fragment can be inserted directly
in the text using a \verb|code| command. The code is
usually going to be displayed using a monospace font. Usually, the
listings have several lines, and can be displayed using an
lstlisting environment, after including the
listings package by putting
\usepackage{listings} in the preamble.
lstlisting has an optional language parameter,
which lets you specify the language of the code snippet for formatting
purposes. For example, a fragment of C++ code can be included in the
document as follows:
\begin{lstlisting}[language=C++]
for(int i=0; i<10; i++) {
    std::cout << i << std::endl;
}
\end{lstlisting}
It is also possible to include a listing from an external file, using
a lstinputlisting command:
\lstinputlisting[language=C++]{file.cpp}❗️Assignment❗️
Find a sample “hello world” program in a language of your choice.
List it in the document by pasting it directly into tex
file, and again by referencing an external file. Remember you have to
save the project to a folder and put the source file there. ***
Images
Images in LaTeX can be included from external file using an
\includegraphics command, which puts the image directly in
text:
\includegraphics[optional arguments]{path to file}The path to image file can be either relative (to tex
source file) or absolute. To embed image.png which is in a
subfolder called figures:
\includegraphics{figures/image.png}Optional arguments include width or height,
for example:
\includegraphics[width=5cm]{figures/image.png}Usually, images are not embedded directly in the text, but placed in
floating environments. For images, a
figure environment is used, with optional placement
argument (for example h - here, t - top of
page, b - bottom of page, p - on a separate
page). Placement is only a suggestion for LaTeX, which can be
made stronger using an exclamation mark. A \centering
command can be used to center whole environment on the page, and a
caption can be added using a \caption{text} command.
Dimension parameters can also use variables such as
\textwidth, which is equal to width of the text column. See
below for an example of scaling the image to 50% of text width:
\begin{figure}[h]
    \centering
    \includegraphics[width=0.5\textwidth]{figures/photo.jpg}
    \caption{Example photo}
\end{figure}
❗️Assignment❗️
Look for a sample image online and insert it in the document in a floating environment. Scale it to 80% of page width, add caption. ***
Tables
Tables can be composed using a tabular environment,
which works in a very similar way to an array in math
environment: cells are separated with & and rows with
\\. Rows can be separated with horizontal lines using
\hline command. In the mandatory argument defining column
content alignment, column borders can be specified with a |
character. Lines can be doubled by repeating | characters
or \hline commands. For example:
\begin{tabular}{|c|c|}
    \hline
    a & b \\ \hline
    c & d \\ \hline
\end{tabular}
Similar to images, a tabular defined this way is treated
as a character and placed in the text. It can be placed in a floating
table environment:
\begin{table}[h]
    \begin{tabular}{|c|c|}
        \hline
        a & b \\ \hline
        c & d \\ \hline
    \end{tabular}
\end{table}
❗️Assignment❗️
Recreate below table in your document:

References
Images and tables appearing in a document should be referenced in the text, to provide proper context. LaTeX allows for assigning a custom label to a figure or a table, and later referencig it using that label. Each image and table has a consecutive number assigned, which will be printed in places where they are referenced, and automatically updated at each compilation.
You can assign a label to an asset with a \label{}
command placed inside figure or table
environments. For example:
\begin{figure}[h]
    \centering
    \includegraphics[width=0.5\textwidth]{figures/photo.jpg}
    \caption{Example photo}
    \label{example-photo}
\end{figure}
This will assign a label of example-photo to above
figure. Labels have to be unique inside a document. You can refer to a
labeled asset in the text using \ref{} command. For
example:
An exemplary photo is shown in Figure \ref{example-photo}❗️Assignment❗️
Create a three-paragraph section of text in your document, filled with placeholder text. Download two pictures of your choice and place them below paragraph 1 and 2, in floating environments. Insert the table from the previous assignment in the third paragraph, also in a floating environment.
Add proper captions to all assets, center them on page.
Add descriptive labels to the images and table, and refer to them inside the placeholder text (e.g. foo is presented in Fig. X, Table Y shows baz, etc.).
Bilbiography
LaTeX includes a convenient tool for generating bibliography and
citations using predefined styles, called BibTeX. A library of entries
which can be used in the document is placed inside a separate
.bib file, placed alongside the document source. An
exemplary entry can look like this:
@manual{Oetiker2018,
  author = "Tobias Oetiker et al.",
  title = "A (Not So) Short Introduction to \LaTeX",
  year = "2018",
  url = "\url{https://ctan.org/pkg/lshort-english}",
}
Each entry begins with an @ sign, followed bytype of the
entry (most commonly used types are book,
article, manual, misc ). Inside
the curly brackets, a label has to be assigned to each entry, unique
throughout the bibliography. It is helpful to use a simple convention
for the labels, e.g. inlcude first author’s surname and year of release,
some keywords etc. Then, all data about the entry is provided, using
predefined fieds. For commonly used types the fields are:
article- required fields: author, title, journal, year, volume
- optional fields: number, pages, month, doi, note, key
book- required fields: author/editor, title, publisher, year
- optional fields: volume/number,series,address,edition,month,note, key, url
manual- required fields: title
- optional fields: author, organization, address, edition, month, year, note, key
misc- required fields: none
- optional fields: author, title, howpublished, month, year, note, key
Note how multiple authors are defined. To use \url
command, include package url (for simple URL formatting) or
hyperref (for clickable links).
To use the bibliography in a document, first specify the style you
want to use, with a \bibliographystyle{style_name} command,
preferably placed in the preamble. Available styles are:
plain- use numbers for references, sort alphabeticallyunsrt- use numbers for references, sort by citation orderalpha- use shortened labels for references, sort alphabeticallyabbrv- similar to plain, but various details are abbreviated
To insert bibliography in the text, use
\bibliography{filename} command, where
filename is the name of .bib file, without
file extension. An entry can be referred to in the text using
\cite{label} command.
Using ready-made BibTeX entries
Many publishers, book-indexing sites, etc. provide ready-made BibTeX entries to avoid manual work and ensure all information is correct.
For example:
Google Books: books.google.com
Find a book you want to cite. Go to details of the book using a link on the right:
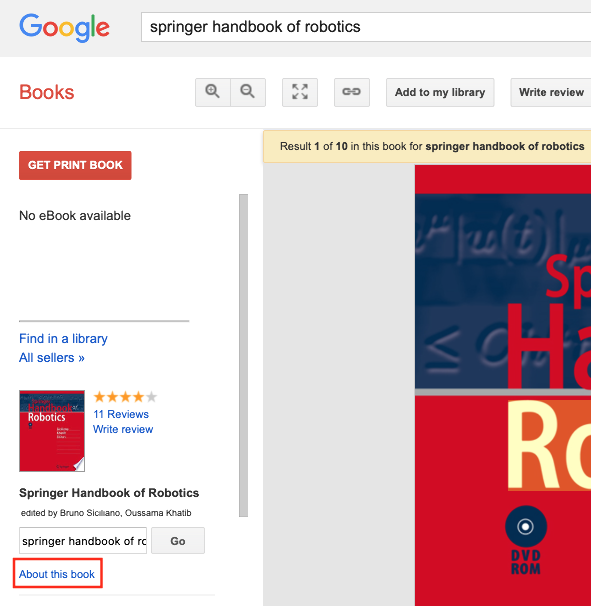
Scroll down to bibliographic information and click BibTeX to
download a file containing a BibTeX entry. Open the file in a text
editor and copy the contents to your .bib file.

Google Scholar scholar.google.com - for various scientific publications:
Find an article you want to cite - by title, author, keywords etc. Click on quotation mark icon:

A pop-up will appear with bibliographic information. Click on the
“BibTeX” link to display it as a bibliography entry, and copy to your
.bib file.

IEEE Explore: ieeexplore.ieee.org
Various publishers have their own websites, one of the most popular scientific organizations is IEEE. Access to most of the content requires a purchase, hovewer, Poznan University of Technology has a subscription and you can access full texts from IPs belonging to PUT. If you don’t have a subscription, you can still access abstracts and bibliographic data.
Find an article you want to cite - by title, author, keywords etc. Click on “download” icon, select BibTeX and download:
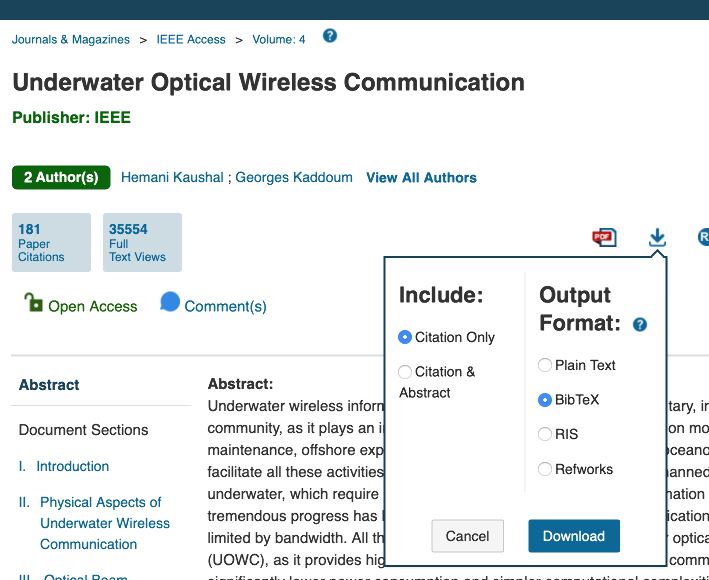
Copy downloaded contents to your .bib dile.
❗️Assignment❗️
Create a bibliography.bib file.
Place four entries there:
- imaginary book by imaginary authors, defined manually
- “Springer Handbook of Robotics”, entry downloaded from Google Books
- a recent article by your favorite (or least favorite) researcher, found on Google Scholar
- an article that matches your interest found at ieeexplore.ieee.org - type in a few keywords that might sound interesting in the search field
Use labels that will let you easily recognize each entry. Cite all the works in various places of a placeholder paragraph.
Overleaf
Overleaf is an online service for live cooperation on LaTeX documents. Editing is done through a web browser, compilation takes place on the server and resulting PDF is displayed, and can be downloaded. The document can be edited simulateously by multiple users, and all changes are visible in almost in real-time (requires a stable Internet connection).
The service requires a free account. The e-mail doesn’t have to be confirmed, so for testing purposes you can use a fake one.
❗️Assignment❗️
- Group in pairs with your closest neighbors.
- Register on Overleaf, remembering the e-mail u used for account creation
- Person A:
- create a document by selecting New Project → Blank
Project:

- share the document with your colleague by selecting Share
and providing their e-mail:
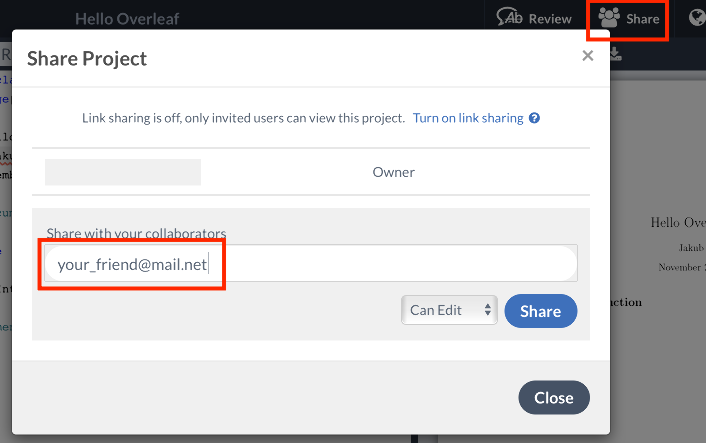
- create a document by selecting New Project → Blank
Project:
- Person B:
- open the document that has been shared with you
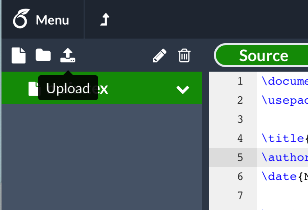
- Collaboratively, add content to your document. Try adding a picture
by uploading it using the panel on the right:
Authors: Jakub Tomczyński, Rafał Kabaciński